
[Android] RecyclerView 사용법 기초
문서 이력
- 2022.03.20. 포스팅
이번 포스팅에서는 많은 element를 가진 리스트를 출력할 때 적합한 RecyclerView에 대해 설명합니다. RecyclerView를 사용하면, Linear한 리스트로 출력하거나, grid 형태로 그리고 여러 줄의 헤더 까지 포함하여 출력할 수 있습니다.
RecyclerView
대형 리스트에 더욱 효과적인, RecyclerView의 동작 원리는 다음과 같습니다.
- 기본적으로, RecyclerView는 현재 스크린에 보여지는 아이템만 그리거나 처리 합니다. 예를 들어, 몇 천개의 아이템 리스트 중 지금 10개만 스크린에서 보인다면 RecyclerView는 이 10개를 그릴 수 있을 만큼만 동작합니다. 사용자가 스크롤 하는 경우, RecyclerView는 스크린에 나타나야할 새로운 아이템이 무엇인지 알아내어 그 아이템을 출력할 수 있을 만큼만 동작합니다.
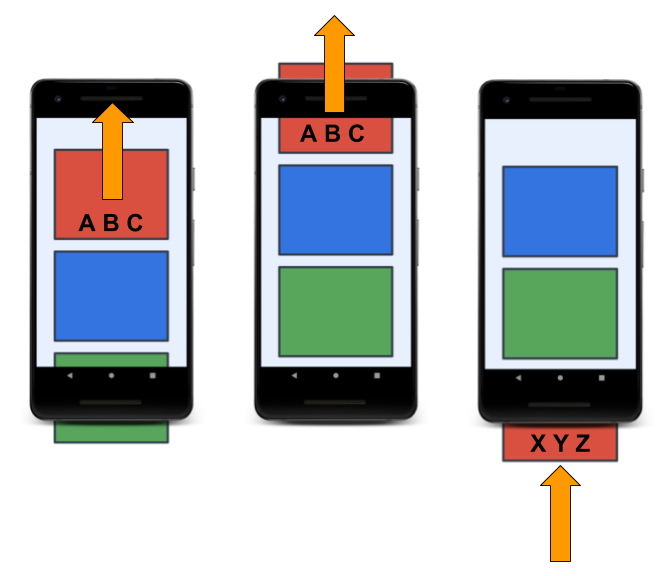
- 하나의 아이템이 스크롤되어 화면에서 사라질 때, 이 아이템의 View는 재활용 (Recycle) 됩니다. 다시 말해, 사라지는 아이템은 다른 아이템의 내용으로 채워져서 다시 스크롤되어 나타납니다. 이러한 RecyclerView의 방식은 스크롤을 부드럽게 해주고, 동작 시간을 줄여줍니다. (아래의 그림 참조)
- 하나의 아이템이 변경되는 경우, 전체 리스트를 다시 그리지 않고, RecyclerView는 해당 아이템만 업데이트 할 수 있습니다.
Adapter pattern
RecyclerView는 Adapter pattern을 사용합니다. RecyclerView의 Adapter는 앱이 데이터를 저장하고 처리하는 방식의 변화없이 앱 데이터를 RecyclerView가 표시할 수 있도록 변환하여 줍니다.
RecyclerView 구현을 위한 필수요소
- 표시될 Data Type과 Data
- RecyclerView instance
- Data 아이템에 대한 layout & View Holder
- LayoutManager
- Adapter
이 요소들을 어떻게 배치하여 RecyclerView 를 구현해야 하는지 아래에서 설명합니다.
RecyclerView 구현
이번 포스팅에서는 Git의 commit log를 리스트로 보여주는 샘플 프로젝트를 예시로 사용합니다. 샘플 프로젝트의 코드에서는 AAC ViewModel 과 DataBinding 을 추가적으로 활용하여, 아이템 리스트 View를 업데이트합니다. 포스팅의 예제에서는 ViewModel 을 활용하지 않지만, DataBinding 은 layout의 요소를 가져온 곳에 일부 사용되었습니다.
RecyclerView Layout
Fragment layout 파일에 RecyclerView를 추가합니다. 지금 예제에서는 layoutManager를 LinearLayoutManager로 추가하였습니다. LinearLayoutManager는 가장 기본적인 layoutManager로서, 가로로 가득찬 아이템을 세로 리스트로 보여줍니다.
<?xml version="1.0" encoding="utf-8"?>

<androidx.recyclerview.widget.RecyclerView
    android:id="@+id/commit_list"
    android:layout_width="match_parent"
    android:layout_height="0dp"
    app:layoutManager="androidx.recyclerview.widget.LinearLayoutManager"

    app:layout_constraintBottom_toBottomOf="parent"
    app:layout_constraintEnd_toEndOf="parent"
    app:layout_constraintStart_toStartOf="parent"
    />
Module의 build.gradle 파일에는 라이브러리 의존성을 추가합니다. version 값은 다른 라이브러리의 호환성을 위해 변경되어 질 수 있습니다.
// RecyclerView
implementation 'androidx.recyclerview:recyclerview:1.2.1'
Data Type 및 layout 구현
Git Commit을 표현하기 위한 data class를 다음과 같이 선언하였습니다.
data class GitCommit(
    val message : String,
    val author : String,
    val timeStamp : String,
    val hash : String,
    val subMessage : String? = null
)
이 Commit Data에 대한 layout 파일 (list_item_commit.xml) 을 다음과 같이 구현합니다. 아래 코드는 예시이므로, 정상적으로 동작하지 않을 수 있습니다.
<?xml version="1.0" encoding="utf-8"?>

<androidx.constraintlayout.widget.ConstraintLayout
        xmlns:android="http://schemas.android.com/apk/res/android"
    xmlns:app="http://schemas.android.com/apk/res-auto"
    xmlns:tools="http://schemas.android.com/tools"
    android:layout_width="match_parent"
    android:layout_height="wrap_content"
    android:layout_marginHorizontal="8dp"
    android:layout_marginVertical="4dp">

    <TextView
        android:id="@+id/hash_text"
        android:layout_width="80dp"
        android:layout_height="wrap_content"
        android:layout_marginEnd="16dp"
        android:gravity="center"

        app:layout_constraintEnd_toEndOf="parent"
        app:layout_constraintTop_toTopOf="@+id/message_title"
        tools:text="123CAF" />

    <TextView
        android:id="@+id/message_title"

        android:layout_width="0dp"
        android:layout_height="wrap_content"
        android:layout_marginStart="8dp"
        android:layout_marginTop="8dp"
        android:layout_marginEnd="16dp"
        android:gravity="center_vertical"

        app:layout_constraintStart_toStartOf="parent"
        app:layout_constraintTop_toTopOf="parent"
        tools:text="Wednesday" />

    <TextView
        android:layout_width="wrap_content"
        android:layout_height="wrap_content"
        android:paddingHorizontal="8dp"
        android:paddingVertical="2dp"
        android:layout_marginStart="8dp"

        app:layout_constraintTop_toTopOf="@+id/message_title"
        app:layout_constraintStart_toEndOf="@+id/message_title"
        />

    <TextView
        android:id="@+id/sub_message"

        android:layout_width="0dp"
        android:layout_height="wrap_content"
        android:layout_marginStart="8dp"
        android:layout_marginTop="16dp"
        android:layout_marginEnd="8dp"

        app:layout_constraintEnd_toEndOf="parent"
        app:layout_constraintStart_toStartOf="parent"
        app:layout_constraintTop_toBottomOf="@+id/message_title"
        tools:text="Very long sub message Very long sub message Very long sub message Very long sub message and \n new line" />

    <TextView
        android:id="@+id/author_timestamp"

        android:layout_width="0dp"
        android:layout_height="20dp"
        android:layout_marginStart="8dp"
        android:layout_marginTop="8dp"
        android:layout_marginEnd="16dp"
        android:layout_marginBottom="8dp"
        android:gravity="center_vertical"

        app:layout_constraintBottom_toBottomOf="parent"
        app:layout_constraintEnd_toStartOf="@+id/hash_text"
        app:layout_constraintStart_toStartOf="parent"
        app:layout_constraintTop_toBottomOf="@+id/sub_message"
        tools:text="Dongmin Kim committed 3 days ago" />
</androidx.constraintlayout.widget.ConstraintLayout>
Adapter 구현
RecyclerView를 구현하기 위하여, 가장 중요한 작업은 Adapter를 구현하는 것 입니다. 먼저, RecyclerView.Adapter를 확장하여, MainAdapter를 만듭니다.
class MainAdapter : RecyclerView.Adapter<>() {}
MainAdapter의 내부에 커밋 데이터의 리스트를 가지고 있을 commitList 변수를 생성합니다. set 메소드를 재정의하여 리스트 데이터가 업데이트 되면, notifyDataSetChanged 함수를 호출하도록 합니다. notifyDataSetChanged 는 Adapter 가 출력해야 하는 데이터 세트가 변경되었으니, 전체 데이터에 대해 갱신하라고 알려주는 함수입니다. 데이터가 어떻게 변경되었는지에 관계없이 그냥 호출해주면 되기 때문에 편리하지만, 성능적인 측면에서는 좋지 않은 방법입니다.
대안으로는 notifyItemChanged(int), notifyItemInserted(int), notifyItemRemoved(int), notifyItemRangeChanged(int, int), notifyItemRangeInserted(int, int), notifyItemRangeRemoved(int, int) 등과 같이 특정 위치와 어떠한 변화가 생겼는지에 따라 특화된 함수가 있으므로 이러한 함수들을 활용할 수 있습니다.
var commitList: List<GitCommit> = emptyList()
    set(value) {
      field = value
      notifyDataSetChanged()
  }
inner class로 ViewHolder를 만들어 줍니다. ViewHolder는 RecyclerView 내부의 아이템에 대한 View와 메타데이터를 묘사하는 역할을 합니다. GitCommit에 대한 ViewHolder를 CommitViewHolder로 만들어 주었습니다.
class CommitViewHolder(private val view: View) : RecyclerView.ViewHolder(view){
    val hashText : TextView = view.findViewById(R.id.hash_text)
    val messageTitle : TextView = view.findViewById(R.id.message_title)
    val authorTimeStamp : TextView = view.findViewById(R.id.author_timestamp)

    fun bind(item: GitCommit) {
        hashText.text = item.hash.substring(0, 6)
        messageTitle.text = if (item.message.length >= 25) {
            item.message.substring(0, 25) + "..."
        } else
            item.message
        authorTimeStamp.text = "${item.author} commited on ${item.timeStamp}"
    }
}
CommitViewHolder는 RecyclerView.ViewHolder를 상속받고 Item layout에 대한 Binding 변수를 생성 인자로 받습니다. 그리고 bind 라는 함수를 구현하여, 넘겨받은 item을 가지고 있는 binding 변수의 layout에 연결하여 update 하는 역할을 합니다.
다시 MainAdapter로 돌아와서, generic type을 설정해주고 3가지의 override 함수를 구현하여 줍니다.
class MainAdapter : RecyclerView.Adapter<MainAdapter.CommitViewHolder>() {
    override fun onCreateViewHolder(parent: ViewGroup, viewType: Int): CommitViewHolder {
        val layoutInflater = LayoutInflater.from(parent.context)
        val view =
            layoutInflater.inflate(R.layout.list_item_commit, parent, false)

        return CommitViewHolder(view)
    }

    override fun onBindViewHolder(holder: CommitViewHolder, position: Int) {
        val item = commitList[position]
        holder.bind(item)
    }

    override fun getItemCount(): Int {
        return commitList.size
    }
}
각 함수의 역할은 다음과 같습니다.
- onCreateViewHolder: CommitViewHolder를 생성하여 반환하는 함수입니다. 이 함수는 두 개의 인자를 받는데, parent는 view holder를 가지고 있을 view group 타입이며, 항상 RecyclerView 입니다. viewType 인자는 하나의 RecyclerView에서 여러 가지 Item view를 출력할 때 사용됩니다.
- onBindViewHolder: RecyclerView 에서 특정 위치의 하나의 리스트 아이템을 표시하기 위해 호출되는 함수입니다. view holder와 bind할 데이터의 위치를 인자로 받습니다. commitList에서 해당 위치의 아이템(GitCommit) 을 가져와서 holder 에 연결시켜 줍니다.
- getItemCount: 전체 아이템의 개수를 반환합니다.
Adapter 생성 및 Data 리스트 설정
MainFragment 에서 (ex. onCreateView 함수 내부) Adapter 변수를 생성하고 RecyclerView에게 해당 Adapter를 사용하라고 알려줍니다. 그리고 Adapter의 commitList Property 변수의 값을 업데이트하여, Adapter가 해당 리스트를 출력할 수 있도록 합니다.
// Get a reference to the binding object and inflate the fragment views.
val binding: FragmentCommitListBinding = DataBindingUtil.inflate(
      inflater, R.layout.fragment_commit_list, container, false)

val adapter = MainAdapter()
binding.commitList.adapter = adapter
adapter.commitList = commits // commits is list of GitCommit
본 포스팅에서는 간단한 예제 코드와 함께 RecylcerView를 사용하는 방법을 알아보았습니다. 링크의 샘플 프로젝트는 아이템에 대한 리스너 구현과 ViewModel로 데이터 리스트를 관리하고, Adapter가 아닌 DataBinding을 통해 item View를 업데이트 합니다.
RecyclerView는 이외에도 DiffUtil 활용, LayoutManager 변경, 헤더 구현 등 여러 추가적인 기능이 있습니다. 기회가 된다면 추후에 추가적인 포스팅을 하도록 하겠습니다.
Leave a comment